
Installing Popsixle via Google Tag Manager (GTM)
Overview
This guide shows how to install Popsixle’s Base Code using Google Tag Manager.
Before you begin
Make sure you have:
Access to your Google Tag Manager account
Your custom Popsixle Base Code snippet from the Popsixle team
Google Chrome or another browser where you can open Developer Tools
Step 1: Get your Popsixle Base Code
The Popsixle team will create your account and send you a custom code snippet. Make sure that you are using the exact code snippet provided by Popsixle.
It will look similar to this:
<script type="text/javascript" src="https://popserve.com/popsixle.php?t=YOUR_CUSTOM_TOKEN"></script>Note: If you haven't received your code snippet, shoot us a message at success@popsixle.com
Step 2: Create a new GTM tag
In Google Tag Manager, create a new tag.
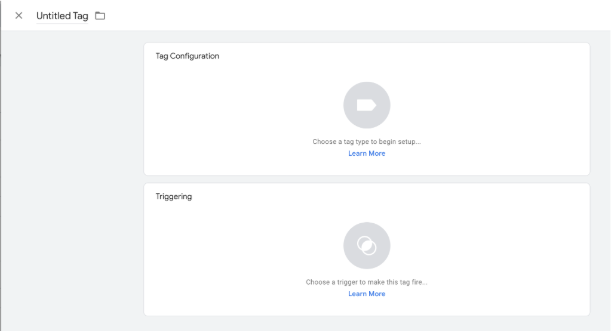
Step 3: Choose Custom HTML
In the tag configuration section:
Select Custom HTML as the tag type.
Paste your custom Popsixle Base Code snippet into the HTML field.
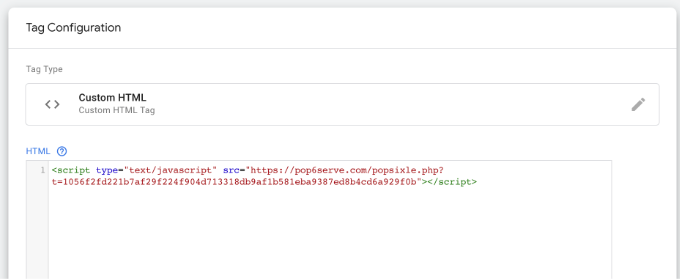
Note: When pasting the code, make sure the quotation marks stay as regular straight quotes. If they change into styled or curly quotes, delete and re-type them so the code works correctly.
Step 4: Choose the All Pages trigger
In the triggering section, choose the All Pages trigger.
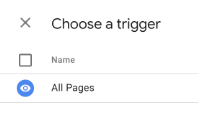
This makes the Popsixle Base Code load across your website.
Step 5: Name and publish the tag
Give the tag a clear name, then save and publish your GTM container.

Step 6: Confirm the tag is working
Open your website in Google Chrome.
Right-click anywhere on the page.
Select Inspect.
Open the Console tab.
Confirm the GTM tag is firing by checking for the message:

Right click anywhere on the page and choose “Inspect” to open up the Advanced Tools section. To confirm the GTM tag is firing, check for the “Popsixle is loading…” logged text in the Console tab.
If your site is headless
If your site is headless, there are a few more steps required after installing the base tag above.
Normally, Popsixle reloads on natural URL changes and page reloads. Headless sites often change pages without a full page reload, so Popsixle needs to be manually triggered whenever the page content refreshes or the route changes.
Before continuing, make sure you have already installed the Popsixle Base Code using the steps above.
Create a separate Custom HTML tag in Google Tag Manager and add:
<script>
if (typeof a10x_dl != 'undefined') {
    pop6_init_05(true);
}
</script>
The true value is important. It re-initializes Popsixle and restarts the page event listeners without sending another PageView event. If true is removed, the tag may re-initialize the code and send a PageView every time the tag fires.Add a route-change trigger
Attach the tag to a GTM trigger that fires every time the page updates or the route changes.
This trigger is custom to your site. You may already have a trigger firing on a custom event or route change.
If you do not have a custom route-change event, consider creating a trigger using the default History Change event.
Example trigger options include:
Gatsby Route Change
Custom Event
History Change
Route Change
Next.js Router Event
In summary, for headless sites, the Popsixle re-initialization tag should fire every time the page content refreshes or the route changes.
Other: How to setup GTM custom triggers
Contact Us
Have questions or concerns? Reach out to the Popsixle via email or through the live chat on our site and a member of our team will get back to you within one business day.