
Compliant Meta Advertising for Restricted Brands - Landing Page, Sites & Data Compliance
Run Facebook & Instagram ads for hemp, cannabis, CBD, health, wellness, and other regulated products, without rejections or account bans.
Legal Reminder: This guide is educational only and not legal advice. If you need formal counsel, consult a qualified attorney.
Quick explanation of our solution: Popsixle routes Meta ad clicks through a fully compliant landing page and sends clean server-side events, letting regulated brands advertise safely.
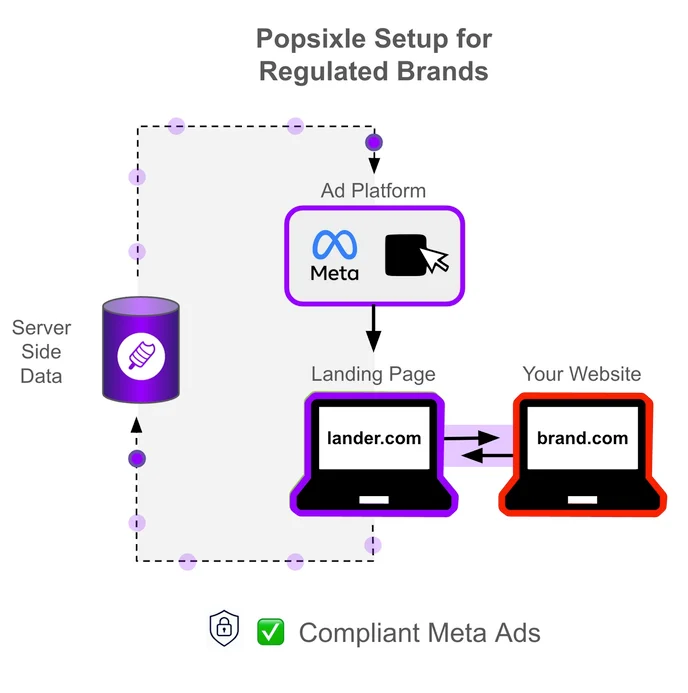
What you'll need to start:
Meta Events Manager access - Ability to create new pixel and view pixel settings is needed as we need you to create a new pixel so prior policy flags don’t follow you.
A fresh website domain - Must be different from the domain of your non-compliant store.
Landing-page build help - An in-house developer, freelancer, or landing page partner to set up your landing page for compliance
Need assistance? Book a call here.
PART I - Plan and Launch a Compliant Landing Page
Register a short, brand-neutral site (example: zenbotanics-info.com).
Add the domain in Business Settings › Brand Safety › Domains and complete Meta’s TXT-record or HTML-file verification.
If you already have a compliant landing page available, you can skip PART 1 and proceed to PART 2.
Landing Page Content Cheat Sheet
A. Hemp / CBD Landing Pages
✅ Mention indirect benefits like "chill out" | ❌ Use “THC,” "CBD", “weed,” or consumption verbs. |
✅ Show lifestyle or product shots only | ❌ Depict ingestion, rolling joints, or smoke. |
✅ Place a few call-to-action buttons ("Shop Now", "Learn More", etc) that drive to your full website | ❌ Include your actual products or checkout |
Wireframe Template
Header | Brand logo, 1 clean product shot, headline (“Plant-Based Support for Daily Calm”). |
Body | Three short bullets (≤ 12 words each). No disease wording. |
Primary CTA | “Shop Now” button → your main Shopify domain / website. |
Footer | Contact email, terms, privacy. |
Examples of compliant landing pages:
Landing Page | Main Site |
PART II - Launch & Verify Your Compliant Landing Page
Make the page live, add a brand-new Meta Pixel (browser-events only), and confirm that Meta sees no policy flags.
A. Publish the Landing Page
Upload files to your host (Netlify, Vercel, S3 + CloudFront, cPanel; any HTTPS host works).
Point your clean domain → the host via an A-record.
Load
https://yourcleandomain.comin a browser—confirm the page loads and links/SSL lock icon all work.
B. Verify the Domain in Meta Business Manager
Go to Business Settings › Brand Safety › Domains.
Click Add → enter your clean domain.
Choose HTML file or Meta-tag method, upload/paste, then tap Verify.
Status turns Verified (green dot) within minutes.
C. Create & Install a Brand-New Meta Pixel (Browser Only)
Why a fresh pixel? Old pixels can inherit hidden policy strikes. Start clean.
In Events Manager, click Connect Data › Web › Connect.
Name the pixel (e.g., Clean-Domain Pixel) → Create Pixel.
Choose Install code manually → copy the base snippet.
Paste the snippet into the
<head>of your landing page (or inject via GTM).Publish / deploy.
D. Generate Test Traffic & Check for Flags
Open the page in a browser 3-5 times (or refresh).
Wait ≈ 20 minutes—Meta can take a bit to display first signals.
In Events Manager, select your new pixel:
Overview tab → look for green PageView events.
Settings › Data Categories → ensure there’s no red banner or “Restricted” tag.
Green dot + “No categories/flags” = you’re in the clear.
PART III - Set up Popsixle Domain Masking/Override
Connect Popsixle to Meta the right way so every checkout event looks like it came from your clean landing-page domain.
Prerequisites (you should already have)
One-page compliant landing site live
Domain verified in Business Manager › Brand Safety
Brand-new Meta Pixel firing PageView browser events
Admin access to your full Shopify store (the non-compliant site)
Install & Configure Popsixle
1 | Install the Popsixle app in your Shopify store (Apps › Add App › search “Popsixle”). | Popsixle runs from the store that handles checkout. |
2 | ⚠︎ Do NOT connect Popsixle to Meta yet—skip the wizard’s data-link step for now. | Prevents early data leakage. |
3 | In Popsixle Shop Settings › Domains, add your domain as an extra domain your account can accept data from | Tells Popsixle which domain to mask to. |
4 | Still in Shop Settings, click Copy Code Snippet. |
|
5 | On your compliant landing page, remove the any Meta pixel code and paste the Popsixle snippet into the | Prevents duplicate Browser events. |
6 | In Popsixle Restricted Brand Controls › Domain Override, toggle ON. Below the Domain Override, enter your compliant landing page then Update. The Current Domain(s) should only show your compliant landing page/s. | Masks every server event to clean-domain.com. |
Connect to Meta
1 | In Popsixle › Data Connections, choose Meta/Facebook → enter your Pixel ID, CAPI Access Token, and Test Event Code. |
2 | Toggle Send Browser Events and Send Server Events → Save & Restart. |
3 | Turn OFF Shopify’s built-in data sharing so only Popsixle sends events: Shopify › Sales Channels › Facebook & Instagram › Settings › Data Sharing › Data sharing off. info.popsixle.com |
4 | Visit clean-domain.com (compliant page) → click through to your full Shopify store → complete a test checkout (use Shopify test payment). |
5 | Wait ≈ 20 min, then in Events Manager check Test Events and Overview |
In Meta Events Manager, you should be seeing
Purchase (Server) appears.
Domains only show clean-domain.com/ and not your main store.
In Events Manager › Settings › Data Categories, confirm no Restricted/Health/Financial flags.
PART IV - Final Checklist
Popsixle app installed in Shopify (non-compliant store)
Domain Masking/Override + Session Stitching toggled ON
Popsixle snippet live on clean-domain (old pixel removed)
Shopify → Facebook data sharing = OFF
Purchase (Server) shows event_source_url = clean-domain.com
No flags under Events Manager › Settings › Data Categories
Do's and Dont's
✅ Keep Domain Masking toggled on after every Popsixle update. | ❌ Turn it off “just to test”. Even one unmasked purchase can trigger review. |
✅ Re-scan new creatives before launch. | ❌ Drive any ad traffic directly to the main store. |
✅ Check Events Manager › Diagnostics frequently. | ❌ Ignore “Event missing deduplication” warnings. |
Other
Build Landing-Page-Only Ad Sets
In Ads Manager create a new Campaign → make sure you use your new, clean pixel in ad set event optimization.
Ad Set › Website: paste the Landing Page URL (not the store).
Exclude existing remarketing audiences built from the old store pixel (they may carry flags).
Publish.
Frequently Asked Questions
Why do I need Domain Masking/Override and Session Stitching?
Without masking, Meta sees checkout events from your main, potentially non-compliant store and may flag or re-categorise your pixel. Popsixle rewrites those events so Meta thinks every action happened on the clean landing-page domain, while session-stitching keeps the Browser and Server copies of each event identical so they deduplicate perfectly.
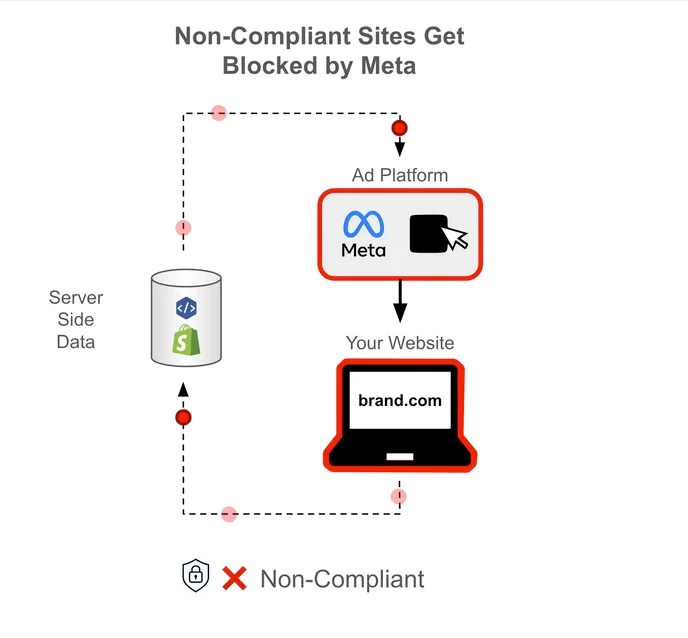
Why a "clean and compliant" domain?
Meta scans every destination URL and treats it just like your ad creative. If the page (or even the root domain) contains restricted terms, medical claims, or checkout links for prohibited products, your entire ad account can be flagged. A fresh domain keeps that risk isolated.
How do I plan the click journey and set up tracking?
To keep Meta from flagging your real store again, direct all ads only to your clean domain. This ensures ads stay compliant while Popsixle preserves attribution by session-stitching and firing events from the clean domain once domain masking/domain override is enabled.
Contact Us
Reach out to the Popsixle via email or through the live chat on our site and a member of our team will get back to you within one business day.